Since its inaugural year I have been a participant in the FireEye / Mandiant Flare-On challenges produced by FLARE, the FireEye Labs Advanced Reverse Engineering. FLARE is one of the industry's most accomplished team of reverse engineers and they have created an annual CTF/ that focuses on reverse engineering challenges, many of which are rooted in real life attacks and incident responses.
I have blogged about FLARE challenges in the past and many readers have noticed that my write-ups tend to steer towards the unexpected solutions. The fun, unconventional, and sometimes offensive solutions to the reader. After all, this is a time to have fun and play with challenges that I do not see on a regular basis. Much of my this originates from my prior experience in a reverse engineering team that focused on intrusions from nation state attacks. Our metrics were on how quick we can provide answers, not how in depth or concise we could be. So my immediate goal is on speed, identifying short cuts, and exploiting every advantage I can find. And then putting the proper methodology into tech debt.
And so, with the completion of Flare-On 9 (2022 edition) I have highlighted my own horrible solutions to a few of the challenges.
Challenge 2 - Pixel Poker
This challenge opens as a simple Windows GUI-based application that displays a large matrix of seemingly random colors. This seems like the start of a steganography based challenge, like what they provided in 2015's challenges.
In a quick review in IDA Pro, one of the first things I look for is the success criteria and the failure criteria. If you click more than 10 times, that is make 10 attempts to find the pixel, it will display a failure message and quit. The first effort then is modifying the execution to remove that check. Upon a comparing the number of attempts to 10 it will JNZ to the correct path. Instead of the check I just made this an absolute JMP.
There is also an obvious RC4 decryption routine mixed in that appeared to be taking the window title, with the attempted x/y coords, as the key. However, during analysis, this appeared to be a decryption for that particular pixel and not of the entire image.

With the error check removed, I started the quick effort of just blindly clicking to see what would happen. Then, I tried automated clicking. I had just written functionality into Noriben to emulate human behavior by moving the mouse and clicking it. Since I had that code on hand I used it here.
When clicking down a column I realized something. All of the pixels were being reverted back to an original state and, when complete, were actually piecing together an image. This was inline with my thoughts on the RC4 decryption. So, instead of reverse engineering the program to determine the actual pixel, I just wrote a program to brute force every pixel.
import pyautogui
pyautogui.PAUSE = 0
pyautogui.FAILSAFE = True

x_offset = 10
y_offset = 475
start_x = 5 + x_offset
start_y = 60 + y_offset
max_x = start_x + 730 - x_offset
max_y = start_y + 600 - y_offset

for x in range(start_x, max_x):
    for y in range(start_y, max_y):
        #print(x, y)
        #pyautogui.moveTo(x, y)
        pyautogui.click(x=x, y=y, clicks=1, button='left')
Within a few minutes I realized that there was text being written to at the bottom of the image. So, as shown in the code, I measured the pixel locations and focused my clicking via x and y offsets. I let it run for a few minutes, and the flag was found. Boom!

Challenge 10 - Nur geträumt
Now this is an interesting one. The description was a bit verbose and gave you a lot of detail to prepare for the challenge. As it was a macOS 7 disk image and application, you would need an emulator for it. Mini vMac, Basilisk, etc. IMO, there was too much help in the description, but installing a proper environment does have challenges. I obtained Mini vMac, the macOS 7 install disks from a suspicious and unauthorized source, and a series of blank disk images to install to.

While that was installing I looked at the provided image. Using binwalk, strings, and a variety of tools showed just basic results. Namely a series of strings that included:
You found the flag!$Remove the umlaut before submi t
99 Luftballons
CRC16 for valid flag
> Flag string (try viewing in hex)
And an interesting short story.
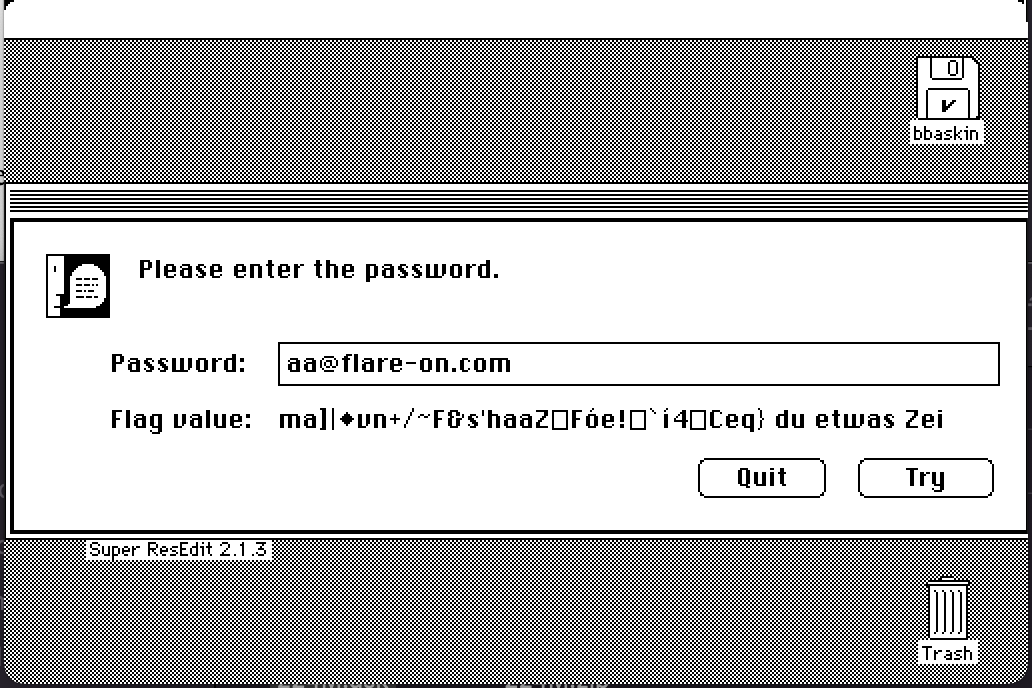
Upon installing the application a quick execution shows a simple input box that displays random binary data when given a value. Using the provided SuperResEdit, there were suspicious items shown. A flag binary resource was found labeled 99 Luftballons.


Since there was no easy means of copying information into the emulator, I took screenshots of the disassembled code, ran through through an online OCR, and pasted the results into my notes to mark up. Using the assembly tutorials I started work to arrange this into code, there is an obvious XOR (called EOR) operation.
Overall... there was nothing much here that stood out. From the data given, one was to input a flag value. That flag value would be XOR'd by the "flag" resource, and the resulting answer would be CRC16's to result in a value of 0x2718. The 0x2718 and the size of the key data in within the resource, with the rest being just an XOR key.
But, at this stage, I could not find a proper key or flag to check the XOR against ... and I did not want to brute force that many bytes through CRC16.
At this point I needed a mental break. Challenges 8 and 9 had done me in. I was just drained and couldn't focus.
So, I went back into the app and just started typing. There was a big clue of 80s music, so I typed in random song titles. What got me thinking was when I typed in a type starting with "Just". The result below showed "Funn". So I tried typing in "Funn" and got "Just". mind blown, this is just a simple XOR routine.
Knowing that, I went straight to crib dragging. I knew the flag ended with @flare-on.com, so it was a matter of finding where it exists in the result to find the appropriate key.
@flare-on.com
a@flare-on.com
aa@flare-on.com
And that was it. A set of obvious data appeared at the end of the results. "du etwas Zei". But since the @flare-on.com cannot possibly be at that location, I continued to drag it. After 32 "a"'s, it showed again. So now I know the potential length of my, before the domain part, is 32-bytes.


I quickly typed in the rest of the first line and ... got most of the flag that then turned corrupted. "@flare-on.com" was missing. I was missing a byte. I put in a random byte and got the correct value. OK, so there was something missing. Knowing it's XOR, and assuming an underscore, I typed an underscore and got a question mark. Putting the question mark back into the answer gave me the underscore in the flag which. But I still had a corrupt "Lied". Seeing the umlaut in the lyrics, I entered it into the key and got the correct flag, for which the instructions said to omit upon submitting.

Challenge 11 - The challenge that shall not be named.
The ultimate challenge, and it is a hard one... If you complete it as planned. It's an executable with tell-tale signs of being a Python executable such as "PYZ" and "_MEIPASS". But, first, let's just run it.
I launched it and tracked results with Noriben ... nothing happened. Tried a few more times. Nothing. OK, maybe some anti-debugging in place.
I executed 11.exe via API Monitor to see what was killing it. Upon it terminating, I located the ExitProcess() and then worked backward to find whatever function was making it go there. Now, here's where I'm questioning myself, because the sample had two distinct failures that I don't see in the official write-ups. It attempted to load mscoree.dll and would fail if not found.
I also saw a strcmp() between the filename (11.exe) and wwahost.exe. I may have misread this check during the challenge to think it was being used. I don't think it actually was part of the challenge, as it took place in kernel32 but, regardless, I was in a hurry and renamed 11.exe to wwahost.exe and executed from there. (Did not take screenshot of this, just copied text to my notes)
# Time of Day Thread Module API Return Value Error Duration
34836 1:29:34.235 PM 1 KERNEL32.DLL wcsncpy_s ( 0x0000029293edff48, 260, "C:\Users\Admin\Desktop\11\11.exe", -1 ) 0 0.0000055
34837 1:29:34.235 PM 1 KERNEL32.DLL wcsrchr ( "C:\Users\Admin\Desktop\11\11.exe", '\' ) 0x000000b7275e8862 0.0000055
34838 1:29:34.235 PM 1 KERNEL32.DLL _wcsicmp ( "11.exe", "wwahost.exe" ) -70 0.0000051
From there it executed, and I reviewed the results more intently. There were numerous calls by pytransform.pyd to copy small bytes of data from presumable the executable to memory.


I discussed this challenge with other winners. Their "short cut" was the simple method laid out in the write-up: to just hijack the local calls from within the PyInstaller extracted folder. Now I really felt like I cheated here 😂
I now have a valid excuse for why I am constantly typing "pythong" in my terminal.
No comments:
Post a Comment